This month, the Artisan Bread Bakers substituted B for Butter instead of Bread for the Bread of the Month (BOM). We made Cultured Butter to go with all the delicious bread we like to bake and enjoy. I like bread and butter so this sounded like an great idea to me.

I've never made butter before. When I think about homemade butter, I have visions of women churning butter by hand. That seems like a very long and tedious process to me so I was never inclined to partake in it. That is, until I saw the directions for this cultured butter. The mixer does most of the work. How easy is that. Oh! And did I mention that it tastes great! In fact, I made some bread to go with the butter rather than the other way around.
I had so much fun making this cultured butter that I already have the ingredients to make some more. I've been telling everyone I'm going to give them some homemade butter. Of course, I'll have to give them some bread to go with it, but that's okay with me. That just means I'll get to bake some more bread. ;)
If you would you like to make some delicious homemade butter, then follow along, it's really easy and fun.
Cultured Butter
Yields two cups buttermilk and about 12 ounces butter
Ingredients:
One quart heavy cream
1/3 cup whole milk yogurt (Dannon is a good brand; make sure whatever you use doesn’t contain any gums or stabilizers)
Salt, to taste
Directions:
Mix the cream and yogurt in a clean glass or ceramic bowl. Avoid plastic, which can harbor bacteria in any scratches or imperfections.

Cover and let rest for 12 -18 hours, until the mixture has thickened slightly and tastes somewhat tangy. If your room is cool (i.e., less than the mid-70s), it may take longer to culture. Mmmm...that tastes good, even with no salt.

Once the mixture has cultured, cool it slightly by placing in the refrigerator for an hour or so, or by submerging the bowl in a sinkful of ice water for a minute or two. The ideal temperature is around 60° F. It was really hot the day I made this butter, plus I was making bread so I left it in the refrigerator for a couple of hours.

Prepare a bowl of ice water, which you will use to clean the butter.
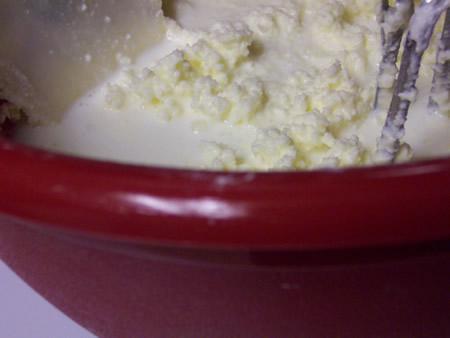
Put the cream mixture in a mixing bowl. If using a stand mixer, use the whisk attachment. Beat the mixture on high until stiff peaks form, then reduce the speed to low. Watch closely at this point, as the cream mixture will soon break, separating into butter and buttermilk. If you have a splash guard on your mixer, you might want to use it so you don’t have buttermilk flying everywhere. Once the mixture breaks, turn off the mixer.
This is what it looks like when it separates. I don't have a splash guard for my mixer so I had to pay close attention. It did make a little mess but not too much.
Pour the buttermilk into a clean container.

You can use this just as you would commercial buttermilk for drinking or baking. If you aren’t going to use it within a week or so, it can be frozen and used later for baking.

Press the butter with a spatula, spoon, or your hand to remove as much buttermilk as possible.

Pour water from the bowl of ice water over the butter to cover.

Rinse the butter by kneading it under the water, then dump off the water.

Continue to add water and rinse until the water you pour off is clear. It is necessary to remove all the residual buttermilk in order to keep the butter from spoiling too quickly.

Once the butter has been cleaned thoroughly, knead it on the counter for a minute.

If you want to salt the butter, press the butter out on the counter, sprinkle lightly with salt, then knead it in.

To store the butter, you can press it into ramekins or, roll it into logs. Cover the ramekins or wrap the logs tightly in plastic wrap. If you make two butter rolls, you can freeze one for later use.
I did both. I rolled some into a log and froze it to enjoy later.

And, I put some in a ramekin to enjoy now.

It sure tasted good in this bread. I used it instead of regular butter. I also enjoyed it on this bread. I forgot to take a photo of a slice smeared with butter, but I'm sure you can envision what that might look (and taste) like. Delish is all I have to say!

BOM (Bread of the Month) is a virtual bread-baking party hosted by Phyl Of Cabbages & King Cakes. Visit the Facebook page to learn more about the Artisan Bread Baking group.
Happy Baking!
Cathy
No comments:
Post a Comment