Showing posts with label Twelve Loaves. Show all posts

Sunday, 5 January 2014

KAMUT Cheddar Biscuits

I got a bag of KAMUT Khorasan white flour the other day and was itching to make something. It was after work when I got the urge to bake so I didn’t have time to make a loaf of bread unless I wanted to stay up late.

I made soup for dinner and decided what I really wanted to serve with the soup was biscuits. Some good ‘ole biscuits.

KAMUT Cheese Biscuits


For some reason, making biscuits with KAMUT sounded like a great idea. I didn’t even give it a second thought that they might not turn out. I took some of the flour, sifted it through my fingers and it felt like biscuits.

The dough was really nice to work with. These biscuits aren’t necessarily light and fluffy, but the flavor and texture draws you in. I tried one of the biscuits as soon as it came out of the oven and it melted in my mouth. I ran upstairs to tell my son to come down quickly because I had made a treat. I mentioned biscuits and he was right there.

Southerners do love our biscuits, but the funny thing is that I am not known for my biscuits. I was always an okay biscuit-maker, but these biscuits are so easy and they taste divine. We enjoyed them so much we almost ate them all in one sitting, but we didn’t. We saved some for the next day. They were delicious warmed over.

The best part about these biscuits is that they are made with a heritage grain. I’m in love with this flour and these biscuits!


KAMUT Cheddar Biscuits

Adapted from: Biscuit Bliss by James Villas

Makes: 10-12 Biscuits

Ingredients:

  • 2 cups KAMUT Khorasan white flour
  • 2 tsp. baking powder
  • 1/2 tsp. salt
  • 6 T. (3/4 stick) chilled butter, cut into pieces
  • 1 cup grated extra-sharp cheddar cheese
  • Cayenne pepper, to taste
  • 1 cup almond milk, plus 1 T. if necessary


Directions:

1) Preheat the oven to 425 degrees F.

2) Whisk together the flour, baking powder, and salt in a large bowl. Cut in the chilled butter pieces using a pastry cutter until the mixture is a mealy texture. Add in the cheese and cayenne pepper and mix until well blended. Pour in the milk and stir until the dough is soft. You might need to add a little more milk to make sure the dough is completely wet.

3) Remove the dough to a lightly floured work surface and knead it gently a few times. 

4) Pat the dough out into a circle about 1/2-inch thick. Cut out rounds using a 2 1/2-inch biscuit cutter.  Work the scraps together and cut additional rounds.

5) Place the rounds on an ungreased baking sheet about 1/2-inch apart. 

kamut-cheese-biscuits_201 kamut-cheese-biscuits_203
kamut-cheese-biscuits_204 kamut-cheese-biscuits_207


6) Bake in the upper third of the oven until the biscuits are golden brown. This will take about 12 to 13 minutes. Serve them while they are hot or room temperature.

KAMUT Cheddar Biscuits


I’m submitting these biscuits to the #TwelveLoaves monthly challenge. The theme for January is “Keep it Simple.” These biscuits are about as simple as you can get.  I used KAMUT Khorasan white flour, but you could use white all-purpose flour if you prefer.

Happy Baking!

Cathy


TWELVE LOAVES_thumb

Tuesday, 12 November 2013

Pumpkin ‘n Spice Chocolate Babka

Pumpkin 'n Spice Chocolate Babka

I just love this time of year and baking with seasonal favorites like pumpkin, apples, and spices galore. I haven’t gotten my fill of pumpkin bread yet so when I found out we were making Spice Breads for the Twelve Loaves baking challenge, I knew I wanted to make something with pumpkin and spice.

In another virtual room, the Artisan Bread Bakers have been making Chocolate Babka. I’ve made Chocolate Cinnamon Babka previously so I thought about skipping the BOM this month. However, I was on call this past weekend for a project implementation and I was craving something sweet to keep me motivated. I usually try to take a little time to bake even when I’m working on the weekend, if possible. I decided that treating myself to some Babka sounded like the perfect incentive to get through the system deployment.

Since I had already made chocolate cinnamon babka before and I wanted to make something with pumpkin, the logical transition was to combine the flavors.

I looked for inspiration for pumpkin babka on Pinterest. I found a few references but none of them really grabbed my attention so I decided to create my own bread.
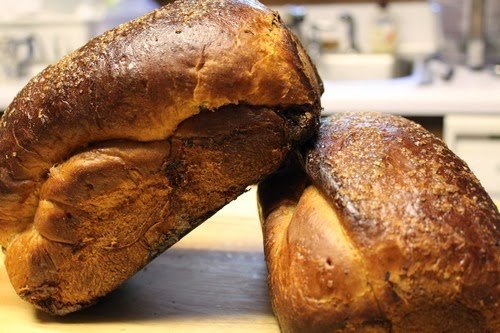
Pumpkin 'n Spice Chocolate Babka Loaves


I started with the Chocolate Cinnamon Babka recipe from Peter Reinhart's book Artisan Breads Every Day.  This recipe makes one very large freeform loaf and I wanted two loaves that could be baked in loaf pans so I converted the recipe to baker’s percentages, added some pumpkin and spices, then increased the amounts of the other ingredients accordingly. It was a fun and tasty project.


Pumpkin ‘n Spice Chocolate Babka

Makes: Two Medium Loaves

Ingredients:

Dough:

  • 2 T instant yeast
  • 130 g (~2/3 cup) lukewarm milk (any kind; at about 95 degrees F.)
  • 105 g (7 T) unsalted butter, melted or at room temperature
  • 105 g (7 T) sugar
  • 4 large egg yolks 
  • 1 1/2 tsp vanilla extract
  • 100 g (scant 1/2 cup) pumpkin puree
  • 525 g  (~4 1/3 cups) all-purpose flour, more for dusting
  • 8 g (1 1/2 tsp) sea salt
  • 1 1/2 tsp cinnamon
  • 1/2 tsp nutmeg
  • 1/4 tsp ginger
  • 1/4 tsp ground cloves

Filling:

  • 255 g (1 1/2 cups) semisweet and dark chocolate chunks
  • 56.5 g (1/4 cup) cold unsalted butter

Egg Wash:

  • 1 large egg white, whisked with a little sugar until frothy
  • raw sugar for sprinkling on top


Directions:

1) Mixing and Kneading the Dough:

Whisk together the yeast and lukewarm milk until dissolved, then let the mixture sit for about 5 minutes.

Meanwhile, cream the butter and sugar until smooth, about 1 to 2 minutes at medium speed on the mixture, using the paddle attachment.

Add the vanilla to the egg yolks and whisk them gently. Add the yolk mixture to the creamed butter and sugar mixture and mix until fluffy, about 2 minutes at medium speed. Add the pumpkin puree. Scrape down the sides of the bowl a couple of times during the mixing cycle.

Stop the mixer and combine the dry ingredients: flour, salt, and spices and add to the mixer bowl. Pour in the milk/yeast mixture. Begin mixing again at low speed, using the dough hook, and mix for 2 to 3 minutes to make a soft, supple, tacky dough.

Transfer the dough to a floured work surface and knead it by hand for about 2 minutes, adding more flour as necessary to make the dough pliable. The dough will be a beautiful golden color and will feel soft and supple. 

achocolate-pumpkin-babka_101


2) Bulk Fermentation

Form the dough into a round ball and place it in a lightly greased bowl.  Cover the bowl tightly with plastic wrap and let the dough ferment for 2 to 3 hours.

achocolate-pumpkin-babka_110


3) Prepare the Filling:

While the dough is rising, grind the chocolate in a food processor until nearly powdered. Cut the butter into small chunks, add to the food processor, and pulse until the butter is evenly dispersed into the chocolate mixture.

achocolate-pumpkin-babka_106


4) Divide and Roll out the Dough

When the dough has risen, divide it into two equal balls using a sharp knife or pastry scraper.

achocolate-pumpkin-babka_112

Roll each piece into a 15 by 15-inch square on a lightly floured surface.  You may need to lift the dough frequently (using the metal pastry scraper) and add more flour underneath to prevent it from sticking to the counter.

Sprinkle the chocolate/butter mixture over each rolled out piece of dough and break up any large clumps.  Cover the surface of the dough, leaving a border.

achocolate-pumpkin-babka_113


5) Shape the Loaves

Roll each piece of dough up jelly-roll style and place seam down on the counter.  Rock the log it back and forth to extend the length to about 18 to 24 inches long.  I forgot to do the lengthening part.

achocolate-pumpkin-babka_115


Grease two 8 1/2” x 4” loaf pans. Carefully twist the log from both ends being careful not to tear it.  Twist it just enough to accentuate the spiral. Coil the twisted log into a circular snail shape. 

achocolate-pumpkin-babka_117


Stand the coil on its end.  It should be perpendicular to the counter and not laying flat. Press down on the coil to compress it and place it in the prepared loaf loaf pan. Repeat with the other loaf.

achocolate-pumpkin-babka_118


6) Proof the Loaves

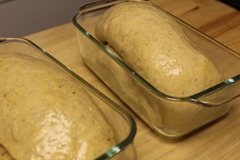
Cover the loaf pans loosely with plastic wrap and let it rise for 2 to 3 hours at a warm room temperature. 

achocolate-pumpkin-babka_119

I placed mine in a 70 degrees proofing box. During this time, the babka should fill the pan and increase by about 1 1/2 times its original size.
achocolate-pumpkin-babka_120


7) Bake the Loaves

Preheat the oven to 350 degrees F.  Using a toothpick, poke a few holes in the top of the loaves. This will help eliminate potential air pockets between the layers of the chocolate and the dough.  It definitely helped, but I think I missed a few places when I was poking with the toothpick because I still ended up with a pocket.

While the oven is preheating, prepare the egg wash. Brush the top of each loaf with egg wash and sprinkle with raw sugar. Bake the loaves for 20 to 30 minutes, then rotate the pans and bake until the tops are a deep rich dark brown. The sides should be a rich golden brown in color and the bottom should sound hollow when tapped lightly on the bottom. The total baking time will be around 50 to 60 minutes.

You may need to tent the loaves if the top starts browning too much due to the egg wash. I thought my loaves were burning so I tented them. Even the darkest places weren’t burnt. The bread will be crispy on the outside when you remove it from the oven, but it will soften as it cools.

achocolate-pumpkin-babka_124

Cool the loaves for at least 90 minutes before slicing and serving. This bread tastes best once the chocolate has had time to set. I waited until the next day to try mine.  It was divine.

I’m glad I made this bread on Saturday. I was busy with the deployment Sunday afternoon and it sure was nice to enjoy a slice of this bread after I was finished.

achocolate-pumpkin-babka_614


I enjoyed one loaf, but gave the other one to a friend in exchange for some work he did for me. I didn’t want to keep all of this yumminess to myself. Bread is an excellent bartering tool. If you haven’t tried it, you should.

 achocolate-pumpkin-babka_205

I’m sharing these loaves with:

BYOB - Il Cestino del Pane

Yeastspotting


Happy Baking!

Cathy


TWELVE-LOAVES10

Monday, 7 October 2013

Roasted Potato & Rye Bread for #twelveloaves

The challenge for the #TwelveLoaves Baking Group this month is to make breads with root vegetables. I had picked up some lovely purple potatoes from the local farmer’s market so now all I had to do was figure out what kind of bread to make.

As luck would have it, David, aka the Rye King, of the Artisan Bread Bakers FB Group, enticed us to bake Roasted Potato & Rye Bread for the BOM (bread of the month).

So I decided to combine the two themes and submit the BOM to Twelve Loaves. Or, maybe I should say I made Twelve Loaves for the BOM. Take your pick, but I do hope you’ll enjoy this crusty and delicious Roasted Potato, Rosemary & Rye Loaf.

roasted-potato-rye-bread_128


Roasted Potato, Rosemary and Rye Bread

David of HearthBakedTunes adaptation from Bread by Jeffrey Hammelman

Ingredients:

Pate Fermente:

  • 9.6 oz Bread flour
  • 6.2 oz Water
  • 0.2 oz Salt
  • 1/8 tsp instant dry yeast

Final Dough:

  • 17.6 oz Bread flour
  • 4.8 oz whole grain Rye flour
  • 13.3 oz Water
  • 0.6 oz Salt
  • 1 1/4 tsp yeast
  • 8 oz roasted potatoes *
  • 2 -3 tablespoons chopped fresh Rosemary
  • 16 oz Pate fermente

* Note from David: Roast potatoes whole, do not cook them with oil and salt and seasoning. Trust me, because I made this with a friend and she roasted the potatoes with olive oil and rosemary and they became too crispy and the finished product was compromised.


Directions:

Prepare the Pate Fermentee

Prepare the Pate Fermentee the day before you plan to make the bread. Add all of the ingredients in a medium bowl and mix using a wooden spoon or Danish dough whisk until just smooth. Allow the preferment to sit at room temperature for 16 hours.

Mix the Dough:

The next day, add all the ingredients to bowl of a stand mixer (except for the preferment) and mix at first speed for three minutes. While the dough comes together add the preferment in small chunks. Then mix on second speed for 4 minutes. The gluten will be moderately developed and the dough should be supple.

roasted-potato-rye-bread_101


Bulk Fermentation:

Let the dough bulk ferment for 90 minutes, and complete one fold after 45 minutes.

roasted-potato-rye-bread_104


Shape and Proof the Loaves:

Shape loaves into round boules or batards. Proof the loaves in proofing baskets or on parchment-lined baking sheets or a bread board for 45 – 60 minutes.

roasted-potato-rye-bread_106 roasted-potato-rye-bread_109


Score the Loaves:

Carefully turn the loaves out from the proofing baskets (if using) onto parchment paper sprinkled with cornmeal.

roasted-potato-rye-bread_110


Score the loaves using the pattern of your choice. I got a little creative with my scoring this time mainly because the first score I made (a square around the top) was too small so I just added more slashes around the sides.

roasted-potato-rye-bread_111


Bake the Loaves:

Preheat the oven to 450 degrees with a baking stone on the middle rack.  Alternately, you can bake the loaves in a La Cloche or other type of Bread Pot or Dutch Oven.

Slide the first loaf onto the preheated stone and spritz the loaf with water using a spray bottle. Spritz the loaf a total of 3 times during the first few minutes of baking. Bake the loaf at 450 until done (about 40 minutes). Rotate the loaf for even baking and remove the parchment paper to allow the bottom to bake through. It might be necessary to reduce the oven temp after twenty minutes due to the starch from the roasted potatoes.

Carefully remove the loaf from the oven and place it on a wire rack for cooling.

Repeat the baking process with the remaining loaf.  If you turned the oven temp down, preheat it again to 450 degrees F. before baking the 2nd loaf.

Slice and Enjoy!

roasted-potato-rye-bread_230


I invited a friend over to help me taste test this bread. He’s originally from Eastern Europe. He took one bite and said  it reminded him of the bread he grew up eating. If you’re wondering why there is only one bread in the photograph, it’s because I sent the other loaf home with him to enjoy.

TWELVE-LOAVES10


I’m sharing these loaves with:

BYOB - Il Cestino del Pane


Happy Baking!

Cathy

Tuesday, 24 September 2013

Rosemary Fig & Onion Flatbread #TwelveLoaves

The baking mission for Twelve Loaves for September was to bake bread with something sweet or savory from the Farmers Market. My Farmers Market Bread is a sweet and savory, crispy delight.

The inspiration for this Rosemary, Fig & Onion Flatbread came across my inbox a few weeks ago and I’ve had it on my list to make ever since.

figgy-flatbread_107


The original version, called Figgy Focaccia, uses a basic bakery pizza dough, but I used a Spelt and olive oil pizza dough made with home milled spelt flour.

The figs came from a local farmer’s market called the Heirloom Living Market. This was the first time I had visited this market. I’ll definitely be visiting it again and again. I got some great vegetables, fruit and other neat items, and had fun chatting with the Market Directors – both of whom are bakers. How cool is that! They even offer a spelt pizza dough, but of course, I wanted to make my own.

I started out making focaccia but it turned out to be a crispy flatbread.  It provided a delicious base for the figs, onions and rosemary.


Rosemary, Fig & Onion Flatbread

For the list of ingredients for the toppings, refer to the recipe for Figgy Focaccia from All Recipes.com

To make the pizza/focaccia dough, follow the directions below:

Spelt and Olive Oil Pizza Dough

This whole wheat pizza crust utilizes an overnight sponge and a biga.

Adapted from: Whole Grain Breads by Peter Reinhart

Makes: 4 Pizza dough balls

Ingredients:

Soaker:

  • 227g (1 3/4 cups) whole grain Spelt flour
  • 4g (1/2 teaspoons) salt
  • 198g (3/4 cup plus 2 tablespoons) water

Biga:

  • 227g (1 3/4 cups) all-purpose Spelt flour
  • 1g (1/4 teaspoon) instant yeast
  • 1/2 – 5/8 cups plus 2 T water

Final Dough:

  • Use all of the soaker
  • Use all of the biga
  • 56.5g (7 tablespoons) whole grain spelt flour
  • 5g (5/8 teaspoons) salt
  • 5g (1 1/2 teaspoons) instant yeast
  • 2 1/4 teaspoons agave nectar
  • 2  tablespoons Olive oil


Directions:

1. Making the Soaker:

Mix the soaker ingredients together until the flour is hydrated. Cover with plastic wrap and let it sit on the counter for 12 to 24 hours.

spelt-olive-oil-pizza_105


2. Making the Biga:

Mix the biga ingredients together in a bowl until the dough forms a ball.  Knead the dough in the bowl for a couple of minutes to ensure the flour is completely hydrated.  You’ll need to use wet hands for this part because the dough is really tacky.  Let the dough rest for 5 minutes, then knead it again using wet hands.  Transfer the dough to a clean bowl and cover it tightly with plastic wrap.  Refrigerate it for at least 8 hours. Take the biga out of the refrigerator about 2 hours before mixing the final dough.

spelt-olive-oil-pizza_107


3. Mixing the Final Dough:

Combine the soaker, biga, 7 tablespoons of whole grain spelt flour, salt, yeast, agave nectar, and 2 tablespoons of olive oil in a medium bowl. Mix with a dough whisk or wet hands until the ingredients are evenly distributed throughout the dough. The dough should be soft and slightly sticky. Add a little more flour if necessary.

spelt-olive-oil-pizza_109


4. Kneading the Dough:

Turn out the dough onto a floured surface and roll the dough in it.  Knead the dough for 3 to 4 minutes, until the dough is soft and very tacky. Let the dough rest for 5 minutes while you line a sheet pan with parchment paper, then oil it with olive oil.

spelt-olive-oil-pizza_114


5. Form the pizza balls

Knead the dough for another minute and make any final adjustments.  The dough will feel soft, supple and very tacky.  Divide the dough into 4 equal pieces, about 8 ounces each.  Form each piece into a tight ball and place the balls on the prepared pan.  Roll the balls in the oil to coat the entire surface.  Cover the pan with plastic wrap and refrigerate until ready to use, up to 24 hours.  You can use the dough right away, but I didn’t need it until that evening so I refrigerated it for several hours until it was time to make the focaccia.

spelt-olive-oil-pizza_117


6. Preparing the Flatbread and Toppings

Preheat the oven to 450 degrees F. with a baking stone on the bottom rack.

The original focaccia recipe had you grill the onions on the grill and then bake the focaccia in the oven. Although grilled onions would’ve tasted great, I thought it was rather silly to use the grill just for the onions so I opted not to use the grill at all.

I took one of the dough balls and spread it out into an oval shape onto parchment paper sprayed with olive oil. Then I drizzled olive oil over the dough and placed thinly sliced onions and fig halves on top of it and gently pressed them down.

Next, I added the rosemary leaves and sprinkled a couple of pinches of kosher salt over the top.

figgy-flatbread_105


7. Baking the Flatbread

Slide the flatbread (on the parchment paper) onto the preheated baking stone. Bake at 450 degrees F. for 15 to 20 minutes or until golden brown.

Cool slightly, then slice and serve warm for a crispy and satisfying meal or appetizer.  I enjoyed mine with a Caesar salad.

figgy-flatbread_109


Happy Baking!

Cathy


For a slightly different whole grain version of this dough, check out my Einkorn and Olive Oil Pizza post.

Monday, 26 August 2013

A cracker it’s not, savory bread, it is…

I tried to make more sourdough rosemary lavish crackers yesterday, but the dough wouldn’t let me. It wanted to be bread. So I made Sourdough Rosemary Focaccia instead.

sourdough-rosemary-foccacia_128


I was feeding my sourdough starters and decided to make crackers with the discarded sourdough. I had invited a friend over who likes sourdough bread so I thought I would introduce him to the Sourdough Rosemary Lavish Crackers topped with roasted tomatoes. I had just slow-roasted some more tomatoes from my garden so I needed to use them up.

I had a little more discarded starter than I had used in the original cracker recipe so I tweaked the recipe a bit to include more starter and flour, etc., but when I mixed all of the ingredients and felt the dough, it wasn’t cracker dough. No, this was different. It was so smooth and buttery (I mean olive oily) and workable. I just knew it wasn’t meant for crackers. This was bread dough. Flatbread dough to be sure.

The good thing about this dough is it is versatile. If you want to make focaccia, use the version below.  If you prefer to make crackers, use the cracker version.  


Savory Sourdough Rosemary Focaccia

Makes: 2 small or 1 large Focaccias

Adapted from: Sourdough Rosemary Lavish Crackers

Ingredients:

  • 1 1/2 cups unfed or recently fed sourdough starter
  • 2 cups unbleached bread flour
  • 1/4 cup, plus 1 tablespoon olive oil
  • 1 1/4 teaspoons sugar
  • 1 1/2 teaspoons sea salt
  • 3 tablespoons fresh rosemary, chopped, additional for garnish
  • 1 tablespoon water, more if needed
  • Kosher salt, for sprinkling on the top
  • Roasted tomatoes, or your choice of toppings


Directions:

1) Preparing the sourdough starter for use in the focaccia:

Remove the starter from the refrigerator, measure the amount needed, and let it warm up to room temperature. If you don’t have enough starter for this recipe, use this method to activate and increase your starter.


2) Mixing the Dough:

Stir the sourdough starter and oil together in a large mixing bowl using a wooden spoon or Danish dough whisk.

Add in the dry ingredients (flour, sugar, salt and rosemary) and mix until thoroughly blended.


3) Bulk Fermentation:

Let the dough ferment for 2-3 hours at room temperature. Do a fold after the first hour. The dough should double in bulk.

sourdough-rosemary-foccacia_102


4) Preparing the Focaccia:

Preheat the oven to 450 degrees F. with a baking stone on the middle rack.

Spray a piece of parchment paper with olive oil.  Remove the dough from the bowl and shape it into a ball.  Place the ball on the parchment paper.  Let it rest for about 5 minutes.

To make small focaccias, cut the dough in half and cover one half while you’re preparing the other one.

 sourdough-rosemary-foccacia_103


5) Shaping and Topping the Focaccia:

Using lightly oiled fingers, spread the first ball of dough into an oval shape on the parchment paper.

Drizzle more olive oil over the top and press lightly with your fingertips to make indentions in the dough. 

Sprinkle kosher salt over the top and place the roasted tomatoes evenly around the edges and middle of the focaccia.  Press them gently into the dough. Drizzle with more olive oil, if desired and garnish with fresh rosemary.

sourdough-rosemary-foccacia_110


6) Baking the Focaccia:

Slide the focaccia onto the preheated baking stone using a pizza peel or the back of a baking sheet.  Bake until it is golden brown about 20 – 25 minutes.  Remove the parchment paper partway through baking to make sure the bottom get’s baked through and evenly browned.


7) Cooling and Serving

Remove the focaccia and let it cool slightly before serving.  You can slice it or break off pieces to serve.

The roasted tomatoes puffed up during baking. It was pretty cool.

sourdough-rosemary-foccacia_123


Someone told me recently that bread just wants to be, well bread. I agree. There’s no doubt that this dough wanted to be bread. It looked like it, smelled like it, felt like it, and ultimately, it was, bread. So I let it be bread.

And, since this savory Sourdough Rosemary Focaccia is not a cracker, I’m submitting it to the Twelve Loaves challenge for August. 


Happy Baking!

Cathy

Friday, 31 May 2013

Honey Graham Oatmeal Spelt Bread

honey-graham-oatmeal-spelt_52

The Twelve Loaves’ Baking Group has been celebrating its one year anniversary this month. I’m still playing catch up from being out of the country so I’m getting this post in just under the wire.

The group decided to celebrate the event by allowing us to make our favorite bread. That’s an easy one!  My family’s favorite bread by far is Oatmeal Bread. There’s just something so comforting about it.

Making this bread brought back fond memories. Oatmeal bread was one of the first breads I learned to make in my bread machine oh so many years ago. My sons still request it.

honey-graham-oatmeal-spelt-sliced


This time, instead of making the bread in the bread machine, I made it completely by hand; no mixer, or bread machine, just a Danish dough whisk.

I took the characteristics of the oatmeal bread we know and love, and enhanced it by using spelt and graham flours. This updated version is nutty and chewy and full of whole grain flavor. 


Honey Graham Oatmeal Spelt Bread

Makes: 1 Loaf

Adapted from Honey Graham Oatmeal Bread

Ingredients:

  • 2 1/4 cups all-purpose Spelt flour
  • 3/4 cup Graham flour
  • 1 cup old-fashioned oats
  • 2 teaspoons instant dry yeast
  • 1 1/2 teaspoons kosher salt
  • 2 tablespoons olive oil
  • 3 tablespoons honey
  • 1 1/3 cups warm milk (I used almond milk)
  • Extra oats for sprinkling on top of loaf, if desired


Directions:

1) Mix the dry ingredients (flours, oats, yeast and salt) together in a large mixing bowl.

honey-graham-oatmeal-spelt_001


2) Incorporate the wet ingredients and mix thoroughly but gently using a large wooden spoon or a Danish dough whisk.

honey-graham-oatmeal-spelt_002


3) Transfer the dough to a lightly floured surface and knead it gently for a few minutes until you have a workable dough.

honey-graham-oatmeal-spelt_003


4) Place the dough in a clean, greased bowl and cover it with plastic wrap.

honey-graham-oatmeal-spelt_004


5) Let the dough bulk ferment for about an hour, or until doubled in size.

honey-graham-oatmeal-spelt_005


6) Remove the dough to a lightly floured surface and gently pat it into a rectangle shape to fit the size of your bread pan.  I used a 9” x 5” nonstick bread pan.

honey-graham-oatmeal-spelt_006


7) Starting from the short end, roll the dough up jelly roll style.

honey-graham-oatmeal-spelt_007


8) Place the dough seam side down in a bread pan sprayed with olive oil or other baking spray.

honey-graham-oatmeal-spelt_009


9) Spray the top of the loaf lightly with water and sprinkle additional oats, if desired. Cover the loaf with plastic wrap and let it proof for 30 –45 minutes or until it crests about 1” to 2” over the rim of the pan.

honey-graham-oatmeal-spelt_011


10) Preheat the oven to 350 degrees F.

If desired, score the loaf with 3 diagonal slashes using a lame or serrated knife.

honey-graham-oatmeal-spelt_013


11) Bake the bread in a preheated 350°F oven for 35 to 40 minutes, until an instant-read thermometer inserted into the center registers 200°F or the dough sounds “hollow” when you thump the top of it. If the bread appears to be browning too quickly, tent it with aluminum foil for the final 10 minutes of baking.

honey-graham-oatmeal-spelt_019


12) Remove the bread from the pan to a cooling rack and let it cool before slicing and serving.

honey-graham-oatmeal-spelt16

This bread has been Yeastspotted.

My oldest son is staying with me right now so the timing was just right to make this homey bread. This is a healthier version of the oatmeal bread he grew up eating.  It’s a little bit denser and chewier, but delicious nonetheless.


Happy Baking!

Cathy