Thursday, 5 May 2011

Bake Your Own Bread (BYOB) May 2011 Roundup

It’s that time again. Time to showcase a month’s worth of bread. I’ve been out of town on business and family matters so I haven’t been baking very much the last few weeks, but luckily for you, the BYOB bakers have been staying very busy. They have some wonderful breads and other baked goods to share with you.

What is BYOB?

BYOB is a yearlong adventure in baking bread.  The goal is to bake as much of your own bread and other baked goods as possible in 2011.
  • For more details or to participate in BYOB in 2011, click here.
  • To view the list of homebakers participating in this adventure, click here


For this month’s roundup, I’m going to let the breads speak for themselves. So grab a cup of tea or the beverage of your choice and sit back and enjoy the wonderful goodies the BYOB Bakers made in April.


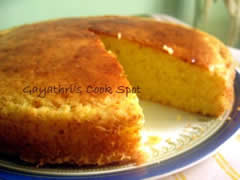
Gayathri of Gayathri's Cook Spot 


Heather of GirliChef


 Beautifully Hand-shaped Bread


Angel Bread


Cindy in Cedar Park, Texas


Cinnamon Raisin Oatmeal Scones


  • Bagels - new recipe from The Bread Bible by Rose Levy Beranbaum which turned out fantastic. We used molasses in the boiling water and it made the bagels nice and dark as well as sweet.
  • Amish Friendship bread
  • Challah
  • Flatbread
  • Banana Nut Raisin muffins and mini-loafs
  • Corn bread

Focaccia - also used this for Pizza


  • Kummelweck Rolls
  • Sourdough

No Yeast, No Sugar Wheat Bread .


Experimented with this one for my sister-in-law who was trying to find a no yeast, no sugar bread for her daughter who may be allergic to yeast. We found it to be very bland. It needs lots of help to be edible so we put peach & mango fruit spread on it. I don't plan to make this again


Kathy in Derwood, Maryland 
  • Ethereal Air Bread
  • Grill Bread
  • Overnight Dinner Rolls
  • Pita Bread
  • Pizza
  • Cinnamon Rolls
  • Jam Rolls
  • Grandma's White Moon Cake


Pam of  Pam’s Bread


Jill of BakingBread-101.com

  • Panda Bread I Struggled with this one!  The original measurements only made soup so I played and played with the recipe until I got a loaf.  The loaf did not turn out very tasty and the eyes of the Panda fell sideways. Lol…I know what you mean. That happened to me the first time I made this bread.
  • Light Multigrain Bread.  I do not have the recipe posted on my website yet in this form, but it was made using my white bread recipe.  I did this by reducing the amount of all purpose white flour by 3 cups and substituted 1 cup of whole wheat flour, 1 cup of rye flour, 1 cup bran cereal,  2 T. milled flax seed, and 1 T. cracked wheat -- www.BakingBread-101.com/whitebread.html.
  • Daughter’s two-layer 12" round birthday cake with butter cream frosting and fondant flowers filled with a cherry filling.  Then I baked jumbo cupcakes for her birthday party at preschool!


Beth of To The Fullest


Soepkipje
Photo album: http://www.ipernity.com/home/soepkipje


Champa of Versatile Kitchen


Di of Di’s Kitchen Notes

Year to date bread baking log: http://diskitchennotebook.blogspot.com/p/byob-2011.html


Soda Bread


Priya of http://eq-myblog.blogspot.com/


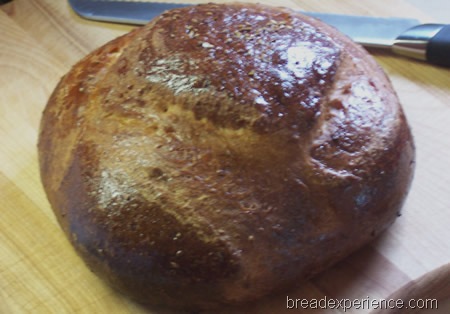
Marion in United Kingdom

White Spelt-Plain White Flour Loaf


This had to be quick - we were just back from a long royal wedding fun weekend at our son's. I used what flour was available in the cupboard. Not ideal as half the flour was not bread flour, just ordinary plain flour. The entire process was over in 2.5 hours including washing up (no dishwasher here) and putting away.
half quantity of each of the two flours
1 tsp salt
1 tsp quick action yeast
1 tsp sugar
approx half pint hand hot water
1 tbs oil

A brief knead adding flour as necessary; the dough rose in about 50 minutes in a well oiled loaf tin on a sunny window ledge. baked on gas mark 7 on high shelf of oven for 15 mins, then on gas mark 4 for 10 mins.

It tasted fine, the texture was good and it smelt nice too.  


Cathy of Bread Experience


Thanks for another great month of baking.  As usual, everything looks wonderful!  Lot's of new recipes to try.


Until next month, BYOB!


~Cathy

Sunday, 1 May 2011

Salt Rising Bread – Bread Baking Day #39

The theme for Bread Baking Day #39 is Salt-Rising Bread.  Salt-rising bread is an old-fashioned artisan bread with a cheesy flavor and dense crumb.

salt-rising-bread 040


“Salt Rising Bread, is a dense, white bread that develops its delicious cheesy flavor from a unique fermentation process.  It is thought to have first been made by pioneer women in the early 1800s in the United States.  As commercial yeast was not available prior to the 1860’s, bread-makers would alternatively create a mixture of either cornmeal or potatoes to make their own rising agent.  It is believed that pioneer women then set their “starter” in a bed of heated rock salt, which often was kept in a salt box next to the hearth fire (thus the name “Salt Rising”) to maintain the required warmth.  In the morning, they would use this liquid, known as  a “raisin” to leaven their bread dough.”  Source: http://www.risingcreekbakery.com/SRB.html


Susan Brown and Jenny Bardwell of Rising Creek Bakery in Pennsylvania showcased their salt-rising breads at the Asheville Artisan Bread Baking Festival.  I was intrigued by this method so I bought one of their loaves and added it to my list to bake soon.

Well, wouldn’t you know it, but Alisa of Easier Than Pie, the host of this month’s bread baking day, chose salt-rising bread as the bread of the month. This gave me the perfect opportunity to try out this method and to introduce you to Susan and Jenny of Rising Creek Bakery.

Susan is also involved with a Salt Rising Bread Project. You can view her findings as well as stories about the history of the bread and original recipes here.


Salt Rising Bread Recipe

Makes: Two 2-pound Loaves

Time from start to finish: About 12 hours

This bread is from a Master’s Thesis completed at Cornell University by Delene Clark Holbrook in 1961.

Susan has several authentic salt-rising bread recipes on her site. I chose Salt Rising Bread Recipe #6 because it uses the least amount of ingredients and only makes a couple of loaves. Of course, if I had known how much I would like it, I would’ve made more because this bread freezes well.

salt-rising-bread 042 


Equipment:

  • 1 wide-mouth gallon jar with screw-top lid (I used a plastic gallon container)
  • Thermometer
  • Gooseneck lamp equipped with 200-watt bulb (I used the light in my oven)
  • Wax pencil (I used masking tape)
  • 2 baking pans, 9 1/4 by 5 1/4 by 2 3/4 inches
  • Clear plastic wrap


Ingredients:

Batter:

  • 1.2 cup whole-wheat flour
  • 1 cup nonfat milk solids
  • 1 1/2 cups water at 140 degrees F. (60 degrees C)

Sponge:

  • 1 cup water at 113 degrees F. (45 degrees C)
  • 4 cups bread flour

Dough:

  • 1 1/2 cups water at 140 degrees F. (60 degrees C)
  • 1/4 cup hydrogenated shortening
  • 1 tablespoon + 1 teaspoon salt (measure carefully)
  • 2 tablespoons granulated sugar
  • 8 cups bread flour


Procedure:

Batter stage, 6 1/2 hours

Mix the whole wheat flour and nonfat milk solids in the gallon jar (or container).

salt-rising-bread 001

Add the water at 140 degrees F to the contents of the jar and mix to moisten all the dry ingredients.

salt-rising-bread 002

Cover the jar with the lid and place away from drafts and 1 inch from a lighted 200-watt bulb. I put the lid on my container and place it in the oven close to the light bulb.  Then I turned the light on and closed the oven door.

salt-rising-bread 006

Let stand for 6 1/2 hours.  Temperature of the batter should be about 113 degrees F.  At this point, I deviated from the recipe a little bit.  I started the process Saturday morning at 9:30 am, but I had to go out of town for the day so I left the batter until 8:30 pm when I got home. So my batter rested in the container for 11 hours instead of 6 1/2.

salt-rising-bread 008


Sponge stage, from 1 1/2 to 2 hours

Add water at 113 degrees F and bread flour to the batter.  Mix only enough to barely moisten the flour.

salt-rising-bread 009

Mark the height of the sponge on the jar with a wax pencil. I used masking tape to mark it. It was about 8:30 pm at this point.

salt-rising-bread 010

Place the container back in the oven with the light on. After 1 hour check the sponge and again mark its height on the jar.  I waited about an hour and a half (until 10:10pm) before I checked the dough.  It had risen a good bit.

salt-rising-bread 011

Remark every 15 minutes or more often if the sponge has risen considerably. I remarked it the first time at 10:10 pm.

salt-rising-bread 012

This is how much the sponge had risen at 10:30 pm.

salt-rising-bread 013

Then I remarked the top the 3rd time.

salt-rising-bread 014

At 10:45 the sponge hadn’t risen too much more.

salt-rising-bread 016

I remarked the top the 4th time and checked it again at 11:05pm.

salt-rising-bread 017

When the sponge no longer continues to rise, or begins to fall, it is time to make the dough. At 11:05 pm, the sponge hadn’t risen anymore, it started to sink so it was time to make the dough.

salt-rising-bread 018

At this point, the sponge had a very strong cheesy smell.  It was almost too strong to bear. 

salt-rising-bread 020


Dough stage, from 1 to 3 hours

Place water at 140 degrees F, shortening, salt, sugar, and flour in a mixing bowl. 

salt-rising-bread 019


Add the sponge and mix slowly until all ingredients are moistened. 

salt-rising-bread 021


Continue mixing or knead lightly until there are no lumps in the dough.  Too much or too vigorous mixing or kneading is detrimental.

salt-rising-bread 022 

Place dough on a floured board (or surface) and divide it into 4 equal portions. 

salt-rising-bread 023


Add more flour if the dough is too soft to shape.  Shape immediately and place 2 portions together, lengthwise, in each oiled baking pan.  I shaped the portions into balls and placed the balls in the pans that way rather than shaping the portions lengthwise.  The Artisan Bread Bakers shaped the  simple milk bread this way and I liked that method because it was really easy.

salt-rising-bread 024


Lightly oil the top of the shaped dough and cover the pan tightly with clear plastic wrap.

salt-rising-bread 025


Place the dough near the light bulb and let it rise until it reaches the top of the baking pan.  Again, I placed the pans in the oven with the light on until the dough had risen to the top of the pans.

salt-rising-bread 029


Baking Instructions:

Remove plastic wrap and bake at 400 degrees F for 35 minutes.

 salt-rising-bread 031

I baked the loaves for 30 minutes, then tested for doneness with a long wooden skewer.  It came out a little bit gummy so I let the bread bake about 5 more minutes until it was completely done.

salt-rising-bread 032

This bread has been YeastSpotted. Please visit Wild Yeast to view all of the lovely breads in the roundup.


Helpful Hints:

To prevent sogginess, remove loaf from pan immediately after baking and allow to cool.

salt-rising-bread 035

To forestall drying out, keep the loaf in an airtight container (or use a bread bag), where it will stay moist several days without molding

If the sponge does not rise to twice or more its original height within 2 hours or the dough does not rise to the top of the pan within 3 hours before baking, the bread will be heavy and may taste sour.


salt-rising-bread 044

This bread is not heavy nor does it taste sour. So despite taking some liberties with the timing, it still tuned out good. My boyfriend and I actually liked this version better than the first loaf we tried because it’s not so cheesy-tasting.  The first loaf we tried reminded me of sourdough but it was a bit too sour.  This one isn’t sour, it’s really good.


image


Thanks to Alisa of Easier Than Pie for hosting Bread Baking Day #39 and challenging us with the salt-rising method of bread baking.  I thoroughly enjoyed making this bread.  It tastes good too!


Happy Baking!

Cathy