Showing posts with label mellow bakers. Show all posts

Monday, 16 April 2012

Lessons in Bread Baking: Oops! I forgot the salt

Have you ever baked something and realized after you took it out of the oven, sliced it, and tasted it, that you left out an important ingredient?  That happened to me with this Quick White Bread, one of the breads for the Mellow Bakers’ new bread bake.

We’re baking through Dan Lepard’s The Handmade Loaf or The Art of Handmade Bread, depending on which version you have. I have both versions because I’m trying to learn the appropriate conversions for both North America and Europe. However, leaving out an ingredient was not supposed to be part of the process.

This was supposed to be an easy and quick loaf. So I decided to experiment with it. I adapted the recipe to include Heirloom 18th Century French Mediterranean Bread Flour from Anson Mills and puffed millet and even baked it in a Pullman pan. However, because I omitted the salt, the dough rose too quickly and collapsed during baking. You can see how it sunk in the photo below. 

heirloom-millet-pullman-loaf17


Instead of deeming this bread a failure, I decided to use it as a teachable moment. This is a perfect example of why you should always follow the first basic step of bread-baking: Mise en Place which means “everything in it’s place”. 

I wrote these very words on my how to make bread page: “Begin by getting all of your tools and ingredients ready and within arms length. The success of your bread-baking experience depends on how organized you are so don't skip this step.”  I’m ashamed to say that I didn’t have my “Mise en Place” and somewhere along the way, I forgot the salt.

Salt serves a number of purposes in bread.  It stabilizes the gluten structure which creates a better dough and adds flavor. It also slows down the fermentation process by dehydrating the yeast and bacteria. Technically, salt is an optional ingredient; however, if you’re going to omit it, you should use cold temperatures to slow down the fermentation process or reduce the rising times. I did neither for this bread so that’s why it fell.

Instead of baking the bread freeform, or in a regular loaf pan, I baked it in a Pullman pan. Here are photos of the process I used to shape and bake the loaf.

image heirloom-millet-pullman-loaf014
heirloom-millet-pullman-loaf015 heirloom-millet-pullman-loaf020
heirloom-millet-pullman-loaf04 heirloom-millet-pullman-loaf09


Although the flavor was a bit bland, all is not lost.  This is a great toast bread which is what I was shooting for. I happen to like saltless breads such as Tuscan Bread so this isn’t a problem for me. I just toasted it, spread it with butter and it tasted yummy. I also made a grilled cheese sandwich with it using extra-sharp natural cheese.  Delish!

I was going to make the bread again with the salt to show you the difference, but I used all of my heirloom flour so I’ll have to show you those results another day.


Happy Baking!

Cathy

Friday, 3 February 2012

Semolina Bread with Wholegrain Soaker

The Mellow Bakers’ journey through Bread: A Baker’s Book of Techniques and Recipes by Jeffrey Hamelman officially came to an end last month, but we’re not starting the next book until April so I decided to work my way through some of the breads I missed.

This Semolina bread is similar to Semolina (Durum) Bread in that it includes a flying sponge; however, this one also includes a grain-and-seed soaker.

semolina-whole-grain-soaker00033


I made some substitutions to the grains in the soaker. I used millet flour instead of millet grains and added some amaranth grains. I also used a combination of all-purpose and bread flour rather than just bread flour.

In addition, I changed the process a bit to fit in with my schedule. After the bulk fermentation, I shaped the loaves, placed them in Banneton baskets and let them proof in the refrigerator overnight.


Semolina (Durum) Bread with a Whole-Grain Soaker

Makes: 2 Large Loaves

Adapted from Bread: A Baker’s Book of Techniques and Recipes by Jeffrey Hamelman

Soaker:

  • 2.6 oz (5/8 cup) coarse cornmeal
  • 1.9 oz (3/8 cup) millet flour
  • 1.9 oz (3/8 cup) sesame seeds (I used a mixture of white, tan and black sesame seeds)
  • 1 T amaranth grains
  • 8 oz (1 cup) water, boiling


Sponge:

  • 6.4 oz (1 1/2 cups) durum flour
  • 3.2 oz (3/4 cup) bread flour
  • 3.2 oz (3/4 cup) all-purpose flour
  • .9 oz (1 1/8 cups) water
  • .17 oz (1 1/2 tsp) yeast


Final Dough:

  • 9.6 oz (2 1/8 cups) semolina flour
  • 4.8 oz (1 cup + 1 T) bread flour
  • 4.8 oz (1 cup + 1 T) all-purpose flour
  • 8.3 oz (1 cup) water
  • .7 oz (1 T + 1/2 tsp) salt
  • 14.4 oz (all of above) soaker
  • 1 lb, 6.2 oz (all of above) sponge


Directions:

1) Make the Soaker:

At least 4 hours before mixing the final dough, pour boiling water over the soaker grains.  Cover the soaker with plastic to prevent evaporation, and let stand at room temperature.

semolina-whole-grain-soaker0001


2) Make the Sponge:

Mix the semolina (durum) flour, bread flour, all-purpose flour, water, and yeast until thoroughly incorporated.  The sponge will be fairly loose. 

semolina-whole-grain-soaker0007


A sponge temperature of 78 to 80 degrees F. is required to allow the sponge to ripen fairly quickly. It should be ripe after about 1 1/2 hours, when it will be on the verge of collapse.

semolina-whole-grain-soaker0010


3) Mix the Dough:

Place all of the ingredients in the mixing bowl, including the soaker and sponge.  In a spiral mixer, mix on first speed for 3 minutes in order to incorporate the ingredients.  Check the dough consistency and make corrections as necessary.  Turn the mixer to second speed and mix for about 3 minutes. 

semolina-whole-grain-soaker0012


The dough should be of medium consistency, with a resisting tug when pulled on. Desired dough temperature is 76 degrees F.

semolina-whole-grain-soaker0013


4) Bulk Fermentation:

Cover the dough with plastic wrap and let it bulk ferment for 1 1/2 hours. 

semolina-whole-grain-soaker0016


5) Fold the Dough:

Fold the dough after 45 minutes of bulk fermentation and place it back in the bowl to ferment for another 45 minutes.


6) Divide and Shape the Loaves

Divide the dough into 2 equal pieces, about 1.5 pounds each.  Preshape lightly into rounds and place on a lightly-floured work surface, seams up.  Cover the rounds with plastic.

semolina-whole-grain-soaker0018


When the dough has relaxed sufficiently (10 to 20 minutes), shape into tight round or oval loaves.  I did one of each and sprayed the top of the loaves with water and sprinkled them with raw sesame seeds.

semolina-whole-grain-soaker0019


Place the loaves into floured bannetons or on lightly floured baker’s linen and cover with plastic.

semolina-whole-grain-soaker0020


7) Final Fermentation:

Proof the loaves for approximately 1 to 1 1/2 hours at 75 degrees F. At this point, it was late so instead of letting the loaves proof on the counter, I covered the baskets with a linen towel and placed them in the refrigerator to retard overnight.

The next morning, I took the loaves out of the refrigerator and let them warm up to room temperature.

semolina-whole-grain-soaker0022


8) Prepare the Oven for Hearth Baking:

Prepare the oven for hearth baking by placing a baking stone on the middle rack of the oven and a steam pan underneath. Then preheat the oven to 475 degrees F.


9) Score the Loaves:

Invert the loaves onto a baking sheet covered with parchment paper.  Then score the loaves in the desired pattern.  I scored an X in the round loaf and a slash down the middle on the oval loaf.

semolina-whole-grain-soaker0023


semolina-whole-grain-soaker0024


10) Baking the Loaves:

Once the oven is preheated, slide the breads (on the parchment paper) directly onto the baking stone and pour 1 cup of water in the steam pan. After 30 seconds, open the door, spray the walls with water, and close the door. Repeat twice more at 30-second intervals.

Bake the bread for 15 minutes, then lower the oven setting to 450 degrees F.  Continue baking for 20 to 30 minutes more.  Check the breads during the bake and rotate them 180 degrees for even baking if necessary.


11) Cooling and Slicing the Loaves:

Remove the loaves to a wire rack to cool completely before slicing and serving.

semolina-whole-grain-soaker00008


This bread has been YeastSpotted. Please visit Wild Yeast to view all of the lovely breads in the weekly roundup.


semolina-whole-grain-soaker00036


I enjoyed making this bread.  It tastes okay, but I think it could be improved.  It’s a dense bread and I don’t mind that; however, the grains seem to overwhelm the flavor of the bread.  I think letting the grains soak overnight instead of just 4 hours and using an overnight sponge rather than a flying sponge would improve the flavor.  I might also prefer sifted cornmeal in the soaker rather than the coarse cornmeal the formula called for. 


Mellow Bakers was started by Paul at Yumarama. We’re baking breads from Bread: A Baker’s Book of Techniques and Recipes by Jeffrey Hamelman.


Happy Baking!

Cathy

Tuesday, 10 January 2012

Semolina (Durum) Bread

The Mellow Bakers are winding down their journey through Bread: A Baker’s Book of Techniques and Recipes by Jeffrey Hamelman.

I’ve been really mellow about baking with this group so I didn’t make all of the breads in the book, but I’ve tried to make at least one bread each month. This month, there are two different types of Semolina Breads on the list so I definitely didn’t want to miss out on that!  I just love breads made with Semolina.
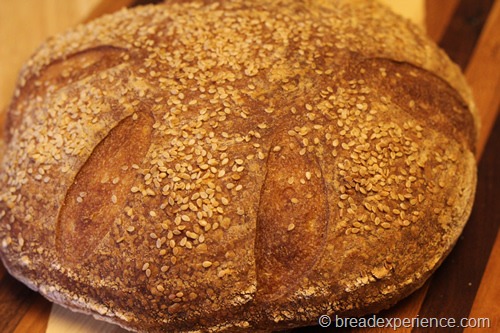
semolina-bread_2360

This Semolina (Durum) Bread utilizes an old-fashioned type of sponge called a “flying sponge”. Don’t you just love that name! This type of sponge was common in Austria and England and probably got it’s name because of the yeast that is added to it; not to mention the fact that the fermentation is relatively short – usually no more than 1 hour.


Semolina (Durum) Bread

Adapted from: Bread: A Baker’s Book of Techniques and Recipes by Jeffrey Hamelman.

Makes: 2 Large Loaves

I changed the process around a bit to suit my schedule.  After the bulk fermentation, it was late so instead of letting the dough rise in the baskets on the counter for an hour or so, I covered the baskets with plastic wrap and a towel and retarded them overnight.  I took them out the next day; let them warm up to room temperature, then I baked them using the steam method. 

Ingredients:

Sponge:

  • Semolina Flour 6.4 oz. (1 1/2 cups)
  • Bread Flour 6.4 oz. (1 1/2 cups)
  • Water 9 oz. (1 1/8 cups)
  • Yeast, instant .13 oz. (1 1/4 tsp.)
  • Sugar .6 oz. (1/2 tsp.)

Final Dough:

  • Semolina Flour 9.6 oz. (2 1/8 cups)
  • Bread Flour 9.6 oz. (2 1/4 cups)
  • Water 10.8 oz. (1 3/8 cups)
  • Salt .6 oz. (1 T.)
  • Olive oil, extra virgin 1.6 oz. (3 T.)
  • Sponge, all of the above


Here is the process I used to make this bread:

Creating the Sponge:

Mix the durum flour, bread flour, water, yeast, and sugar until evenly incorporated.  You can use the mixer, but I just used my Danish dough whisk. The sponge should be fairly loose.  Let the sponge ripen for about 1 1/4 hours.

semolina-bread_2267


Mixing the Dough:

Add all of the ingredients, including the sponge, to the mixing bowl and mix on first speed until all of the ingredients are incorporated, about 3 minutes.

Increase the speed to the second speed and mix for another 2 to 3 minutes.  The dough will be of medium consistency. It should have noticeable gluten development.

semolina-bread_2270 semolina-bread_2271


Bulk Fermentation:

Let the dough bulk ferment for 1 1/2 hours and fold the dough after 45 minutes.  I let the dough bulk ferment for 2 hours and folded it about 1 hour, then I proceeded with the shaping.

semolina-bread_2276


Dividing and Shaping the Loaves:

Divide the dough into 1.5-pound pieces, preshape lightly into rounds and place the rounds on a lightly floured surface, seams up.  Cover the rounds with plastic.

semolina-bread_2277


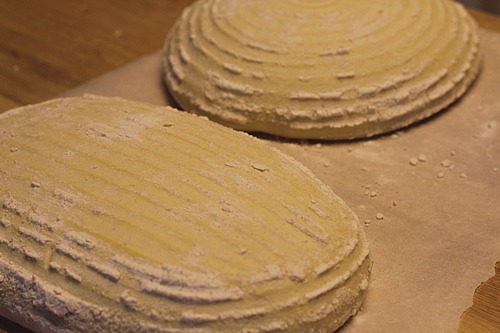
After about 10-20 minutes, when the dough has relaxed sufficiently, shape it into tight round or oval loaves.  Place the loaves into floured bannetons.  I used one round and one oval banneton basket. I always coat the inside of the baskets with a mixture of rice flour and all-purpose flour. This mixture seems to help prevent the dough from sticking to the basket. 

semolina-bread_2280

At this point, I covered the baskets with plastic wrap and a kitchen towel and placed them in the refrigerator to retard overnight.


Preparing the Loaves for Baking:

The next day, I removed the baskets of dough from the refrigerator and let them warm up to room temperature for about an hour or so.

semolina-bread_2283


Preparing the Oven for Hearth Baking:

I prepared the oven for hearth baking by placing a baking stone on the middle rack of the oven and a steam pan underneath. Then preheat the oven to 475 degrees F.

I inverted the loaves onto a baking sheet covered with parchment paper.  They came out of the baskets really easily.
semolina-bread_2285


Scoring the Loaves:

I used my new Bordelaise Lame to score the loaves.  I’ll tell you more about it later.  I’m still testing it. So far I really like it!

I decided to try a different scoring on the round loaf.  I just scored the oval loaf straight down the middle.

Spray the top of the loaves with water and sprinkle them with sesame seeds. I should’ve done this before I scored it, but I sort of forgot.  I was too excited to try out my new lame.

semolina-bread_2288 semolina-bread_2289
semolina-bread_2290 semolina-bread_2294


Baking the Loaves:

Once the oven is preheated, slide the breads (on the parchment paper) directly onto the baking stone and pour 1 cup of water in the steam pan. After 30 seconds, open the door, spray the walls with water, and close the door. Repeat twice more at 30-second intervals.

Bake the bread for 15 minutes, then lower the oven setting to 450 degrees F.  Continue baking for 20 to 30 minutes more.  Check the breads during the bake and rotate them 180 degrees for even baking if necessary.


Cooling and Slicing the Loaves:

Remove the loaves to a wire rack to cool completely before slicing and serving.

semolina-bread_2300 semolina-bread_2371

This bread has been YeastSpotted. Please visit Wild Yeast to view all of the lovely breads in the weekly roundup.

The sponge gives this bread a lightness and a unique flavor. It has a nutty and crispy crust with a chewy interior. The fact that I fermented it overnight also added to the flavor and texture. I really like it!

I sent one of the loaves to my son in college.  He went back to school this past weekend, and he forgot his towels so I shipped the towels and a loaf of bread to him.  He’s been enjoying this bread along with some homemade Blueberry Jam. 


Mellow Bakers was started by Paul at Yumarama. We’re baking breads from Bread: A Baker’s Book of Techniques and Recipes by Jeffrey Hamelman.


Happy Baking!

Cathy

Friday, 16 December 2011

66 Percent Sourdough Rye

It took me awhile, but I’m becoming a fan of rye, particularly rye breads made with sourdough.  As the name suggests, this 66 Percent Sourdough Rye Bread is made with 66 percent rye flour. 

There are many advantages to using sourdough in rye breads. Besides providing good leavening ability, sourdough provides the benefits of good eating quality, increased nutrition, and good keeping quality. What’s not to like about that!

I didn’t have an appreciation for the complexity of rye until recently.  Rye flour is totally different from wheat in virtually all aspects… from the way it’s grown, to mixing, fermenting, proofing, steaming, baking, and eating breads made with rye. It’s a very unique grain with unique requirements.  I’m looking forward to experimenting more with this grain.

66-percent-sourdough-rye_1951


66 Percent Sourdough Rye

Makes: Two Large Loaves

Adapted from Bread: A Baker’s Book of Techniques and Recipes by Jeffrey Hamelman

Ingredients:

Sourdough:

  • 12.8 oz (3 1/2 cups) whole-rye flour (sifted once, see * below)
  • 12 oz (1 1/2 cups) water  (I used a little more water than the original formula suggested due to the absorption rate of the whole grain rye)
  • .6 oz (2 T) mature sourdough culture

Final Dough:

  • 8.3 oz (1 1/8 cups) whole-rye flour (sifted once, see * below)
  • 10.9 oz (2 1/2 cups) high-gluten flour
  • 13.8 oz (1 3/4 cups) water
  • .6 oz (1 T) salt
  • .1 oz (1 tsp) instant dry yeast
  • 1 lb, 7 oz sourdough (all of the above minus 2 T)


* The original formula called for medium rye flour, but I didn’t have any so I used freshly-milled whole rye flour and sifted it once to remove some of the bran and germ. 

66-percent-sourdough-rye_1905


The flour milled from the whole rye grain would actually be closer to a rye meal, but after removing some of the bran and germ, it looks more like flour.

66-percent-sourdough-rye_1907


Directions:

1) Preparing the Sourdough:

Prepare the sourdough by mixing all of the ingredients together.

66-percent-sourdough-rye_1911


Let it ripen for 14 to 16 hours at 70 degrees F.

66-percent-sourdough-rye_1912


2) Mixing the Dough: 

Add all of the ingredients to the mixing bowl.  In a spiral mixer, mix for 3 minutes on first speed and about 2 minutes on second speed.  When you pull on the dough, you will feel a bit of gluten strength, but the overall dough strength won’t be very much.  The desired dough temperature is 80 degrees F.

66-percent-sourdough-rye_1914


3) Bulk Fermentation:

30 to 45 minutes.  Rye doughs ferment more quickly than wheat doughs so be careful not to overproof the dough.

66-percent-sourdough-rye_1915


4) Dividing and Shaping the Dough:

Divide the dough into 1.5-pound pieces; shape round or oblong.  I shaped mine into batards.

Shaping Batards: Gently divide the dough into two pieces and shape the pieces into boules.  Cover and let them rest on the counter for 15 minutes.  I used wet hands for this part because the dough was rather sticky.

66-percent-sourdough-rye_1916


To make the batard shape, gently pat the dough into a rough rectangle.

66-percent-sourdough-rye_1919


Fold the bottom third of dough, letter style, up to the center and press to seal, creating surface tension on the outer edge. Fold the remaining dough over the top and use the edge of your hand to seal the seam closed and to increase the surface tension all over.

66-percent-sourdough-rye_1918


Form the other ball of dough the same way, then transfer the loaves to a parchment-lined baking sheet for proofing. 

66-percent-sourdough-rye_1920


5) Final Fermentation:

Cover the loaves loosely with plastic wrap. Let them proof for 50 to 60 minutes at 80 degrees F.  I placed my loaves in the oven with the light on.

66-percent-sourdough-rye_1924


6) Scoring the Loaves:

Score the loaves down the middle using a serrated knife or lame.

66-percent-sourdough-rye_1925


66-percent-sourdough-rye_1926


7) Baking the Loaves

Prepare the oven for hearth baking by placing a baking stone on the middle rack of the oven and a steam pan underneath.  Preheat the oven to 475 degrees F.  Slide the breads (on the parchment paper) directly onto the baking stone and pour 1 cup of water in the steam pan. After 30 seconds, open the door, spray the walls with water, and close the door. Repeat twice more at 30-second intervals.

66-percent-sourdough-rye_1927


Bake the bread for 15 minutes, then lower the oven setting to 450.  Continue baking for 30 to 40 minutes.  Check the breads during the bake and rotate them 180 degrees for even baking.


8) Cooling and Slicing the Loaves:

Remove the loaves to a wire rack to cool completely. The baked bread should rest for up to 24 hours before slicing in order to improve its eating quality.

66-percent-sourdough-rye_1942


This bread definitely has good keeping quality. My version is a little bit heavier due to the whole grain rye, but the flavor is really good. I let the bread rest on the counter for 24 hours as suggested. It has a very deep flavor and goes really well with cheese. It also tastes good just plain.  It has just a hint of a sour flavor. I like that!

66-percent-sourdough-rye_1957


I think this bread would taste good in Tomato Bread Soup or Sourdough Strata. However, I found something different I’m going to try. It’s a unique Christmas Bread made with bread cubes from day-old rye bread.


Mellow Bakers was started by Paul at Yumarama. We’re baking breads from Bread: A Baker’s Book of Techniques and Recipes by Jeffrey Hamelman.


Happy Baking!

Cathy